Getting Started
This section walks you through a brief introduction to using IAMR.
Downloading the code
IAMR is built on top of the AMReX framework. In order to run IAMR, you must download separate git modules for IAMR, AMReX and AMReX-Hydro.
First, make sure that git is installed on your machine.
Download the AMReX repository by typing:
git clone https://github.com/AMReX-Codes/amrex.git
This will create a folder called
amrex/on your machine.Download the AMReX-Hydro repository by typing:
git clone https://github.com/AMReX-Fluids/AMReX-Hydro.git
This will create a folder called
AMReX-Hydro/on your machine.Download the IAMR repository by typing:
git clone https://github.com/AMReX-Fluids/IAMR.git
This will create a folder called
IAMR/on your machine.
You will want to periodically update each of these repositories
by typing git pull within each repository.
Building the code
Here, we walk you through compiling an IAMR executable.
We’ll build the source code in one of the IAMR/Tutorials directories.
A description of the included problems is given in Tutorials/README.md
or in the Tutorials Section.
To build the code:
cdto the desired build directory.Edit the
GNUmakefile:Set AMREX_HOME to be the path to the directory where you have put amrex. NOTE: when setting
AMREX_HOMEin theGNUmakefile, be aware that~does not expand, soAMREX_HOME=~/amrex/will yield an error.Alternatively, the path to AMReX can be set up as an environment variable,
AMREX_HOME, on your machine to point to the path name where you have put AMReX. For example, if you are using the bash shell, you can add this to your.bashrcas:export AMREX_HOME=/path/to/amrex
alternatively, in tcsh one can set
setenv AMREX_HOME /path/to/amrexOther options that you can set in the GNUMakefile include
Option name
Description
Possible values
Default value
COMP
Compiler (gnu or intel)
gnu / intel
None
USE_MPI
Whether to enable MPI
TRUE / FALSE
FALSE
USE_OMP
Whether to enable OpenMP
TRUE / FALSE
FALSE
USE_CUDA
Whether to enable CUDA
TRUE / FALSE
FALSE
DEBUG
Whether to use DEBUG mode
TRUE / FALSE
FALSE
PROFILE
Include profiling info
TRUE / FALSE
FALSE
TINY_PROFILE
Include tiny profiling info
TRUE / FALSE
FALSE
COMM_PROFILE
Include comm profiling info
TRUE / FALSE
FALSE
TRACE_PROFILE
Include trace profiling info
TRUE / FALSE
FALSE
Note
Do not set both USE_OMP and USE_CUDA to true.
Information on using other compilers can be found in the AMReX documentation at https://amrex-codes.github.io/amrex/docs_html/BuildingAMReX.html .
Make the executable:
Now type
make
The name of the resulting executable (generated by the make system) encodes several of the build characteristics, including dimensionality of the problem, compiler name, and whether MPI and/or OpenMP were linked with the executable. Thus, several different build configurations may coexist simultaneously in a problem folder. For example, the default build in
IAMR/Tutorials/FlowPastCylinderwill look likeamr3d.gnu.MPI.ex, indicating that this is a 3-d version of the code, made withCOMP=gnu, andUSE_MPI=TRUE.
Running the code
IAMR takes an input file as its first command-line argument. The file may
contain a set of parameter definitions that will overrides defaults set in the code.
For example, to run an example in IAMR/Tutorials/Bubble, type:
./amr2d.gnu.ex inputs.2d.bubble
IAMR typically generates subfolders in the current folder that
are named plt00000, plt00010, etc, and chk00000,
chk00010, etc. These are called plotfiles and checkpoint
files. The plotfiles are used for visualization of derived fields; the checkpoint
files are used for restarting the code. The output folders contain a set of ASCII and binary files. The field
data is generally written in a self-describing binary format; the
ASCII header files provide additional metadata to give AMR context to the field data.
Visualizing the Results
There are several options for visualizing the data. VisIt supports the AMReX file format natively, as does the yt python package and ParaView. Amrvis is a package developed by CCSE that is designed specifically for highly efficient visualization of block-structured hierarchical AMR data. We have also created a number of routines to convert AMReX plotfile data to other formats (such as MATLAB), but in order to properly interpret the hierarchical AMR data, each tends to have its own idiosyncrasies. If you would like to display the data in another format, please let us know and we will point you to whatever we have that can help.
Here we provide instructions on downloading and using Amrvis. For more information on visualization, including using other software for visualization, please see the Visualization Section.
Get Amrvis:
git clone https://ccse.lbl.gov/pub/Downloads/Amrvis.git
Then cd into Amrvis/, edit the GNUmakefile there to set DIM = 2, and again set COMP to the compiler suite you have. Leave DEBUG = FALSE.
Type make to build, resulting in an executable that looks like amrvis2d…ex.
If you want to build amrvis with DIM = 3, you must first download and build volpack:
git clone https://ccse.lbl.gov/pub/Downloads/volpack.git
Then cd into volpack/ and type make.
Note: Amrvis requires the OSF/Motif libraries and headers. If you don’t have these you will need to install the development version of motif through your package manager. lesstif gives some functionality and will allow you to build the amrvis executable, but Amrvis may exhibit subtle anomalies.
On most Linux distributions, the motif library is provided by the openmotif package, and its header files (like Xm.h) are provided by openmotif-devel. If those packages are not installed, then use the OS-specific package management tool to install them.
You may then want to create an alias to amrvis2d, for example
alias amrvis2d /tmp/Amrvis/amrvis2d.gnu.exReturn to the
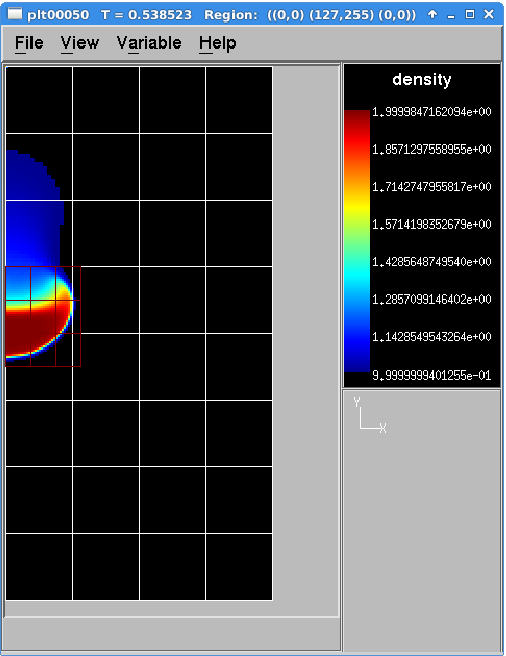
IAMR/Tutorials/Bubblefolder. You should have a number of output files, including some in the form pltXXXXX, where XXXXX is a number corresponding to the timestep the file was output. To see a single plotfile, typeamrvis2d <filename>
Fig. 1 Amrvis visualization tool
Or to animate the sequence of plotfiles, use
amrvis2d -a plt\*
Within Amrvis you can change which variable you are looking at and/or select a region and click “Dataset” (under View) in order to look at the actual numbers. You can also export the pictures in several different formats under “File/Export”.